Start Block
The start block is where every program will start. Your program with run blocks one after another from the start block. As such, all blocks in your program need to be connected to this block either directly, or by being joined though other blocks. The UK National Curriculum refers to this as sequence.
Clicking on the cog of this block gives you access to configuration checkboxes for your program. Ticking the checkboxes enables more configuration options to appear in the start block. For example you can select which leg will drive a speaker to play music.
Direction
This option refers to how you want the LED grid to be displayed. If for example you wanted to use CodeBug with the button ears at the bottom, you would select the down option for this block. This means text, images and LEDs set will be rotated around so they are readable in this new direction.
Sleep after
This option allows you to save power by putting CodeBug into a deep sleep. You can specify how many minutes you want CodeBug to wait before going to sleep using the dropdown menu on this block. Alternatively, you can set it to never go to sleep.
Leg (0-3) input/output
These option lets you set up CodeBug’s metal ring legs as either digital inputs, analogue inputs, digital outputs or music outputs. These choices can be selected with the dropdown menus where you can specify what mode you want the leg to be set to.
Leg (0,2,3) pullup
This option is used to turn the touch input feature of CodeBug’s legs on or off (on by default). By enabling the pullup with the dropdown option menu you turn off the touch feature.
Basics
These are simple useful blocks.
Pause for time
The pause block will cause your program to wait until the amount of time specified in milliseconds has past (1000ms in a second). The same pause block can be found in the music menu, but has another block already inside it which returns the number of milliseconds for a 'beat' in music.
Pause until input
This block will cause your program to wait until the user presses one of CodeBug’s buttons (A or B). The 5x5 display will stay on.
Sleep until input
This block will cause CodeBug to sleep until the user presses one of the buttons (A or B). The 5x5 display will turn off.
5x5 Display
These blocks are used to control the 5x5 LED pixel grid on the front of CodeBug.
Set pixel
Sets the specified pixel to the given state (either on or off). x, y take a numbers specify the position of the pixel on the display, and the state sets if it is lit or unlit. x and y should be given a value from 0 to 4. The state block should be given a value of 0 or 1.
Get pixel
Returns the state of the pixel at position x,y. x and y should be given a value from 0 to 4. This block returns a number (either 0 or 1) and therefore can be used anywhere a number block is used.
Set row
Sets the pixels on the specified row y to a value. The y is given as a number block and should be given a value from 0 to 4. The value is given as a number which will be interpreted as a binary representation to be displayed on the row. The rightmost pixel (x=4) is the least significant (rightmost) bit.
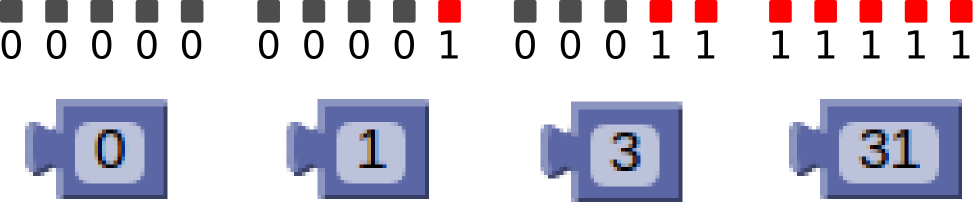
Get row
Returns the value of the specified row (y). The y is given as a number block and should be given a value from 0 to 4. The value is returned as a number that interprets the lights on the row in binary. x=4 is the least significant bit.
Set col
Sets the LED pixels on the specified column x to a value. The x is given as a number a value from 0 to 4. The value is given as a number which will be interpreted as a binary representation to be displayed on the col. y=4 is the least significant bit.
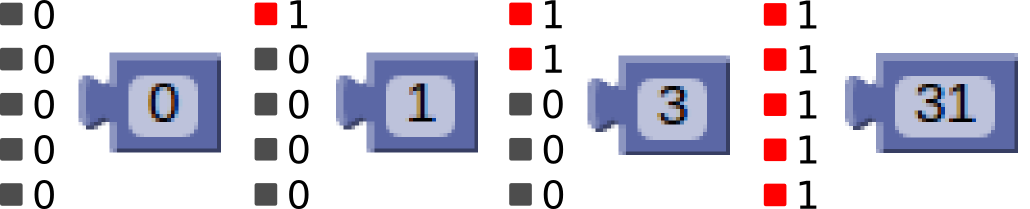
Get col
Gets the value of the specified row (y). The y is given as a number block with a value from 0 to 4. The value returned is a number representing that interprets the lights on the column in binary. y=4 is the least significant bit.
Clear pixels
Turns off all the LEDs.
Sprite
Sprites are simple images made from pixels. They can be custom images like a smiley face, or text and characters.
Draw sprite
Puts a given sprite on the LED grid, turning the individual LEDs on or off to achieve the required pattern. This block accepts a sprite as an input. You could try creating a sprite with one of the following blocks: Get character sprite, Get string sprite, Build sprite.
Scroll sprite
Moves a sprite across the LED grid, turning the individual LEDs on or off successively. The sprite scrolls in the direction given by its drop down menu and at the speed given as a number block. This number is the time between pixel movements in milliseconds. This block accepts a sprite as an input. You could try creating a sprite with one of the following blocks: Get character sprite, Get string sprite, Build sprite.
Get character sprite
Returns a sprite of the character given in the block’s text box.
Get string sprite
In computing we call a list of characters, like the letters that make up a word, a String.
This block returns a sprite of the given text string, in the direction given by its drop down menu.
Text
Returns a text string. This can be used with the Scroll sprite and Get string sprite blocks to display text on CodeBug’s LED display.
Build sprite
Returns a sprite of the given pixel map. Use your mouse to make a picture. Ticked checkboxes have the corresponding LED on, and unticked have it off.
Get sprite from
Returns a sprite from the LED grid with a given x/y offset and of a given height and width. The x/y and height/width are all given as number blocks that can be changed or replaced with variable blocks. The x/y should be given between 0 to 4. The height/width should be given between 1 to 5.
Get width of sprite
Returns the width in pixels of a sprite as a number.
Get height of sprite
Returns the height in pixels of a sprite as a number.
Inputs/Outputs
These are blocks for reading the value of leg inputs and buttons, and setting the leg outputs.
Button Pressed
Returns true if the given button (A or B) from its drop down menu is pressed, otherwise it returns false.
Get button
Returns 0 if the given button (A or B) from its drop down menu is pressed, otherwise it returns 1. The buttons connect to ground (logic low i.e. 0) when pressed.
Leg grounded
Returns true if an input leg has been connected to the ground (GND) leg, otherwise it returns false. The leg is given from its drop down menu.
Turn leg
Sets the given leg to the given value. The leg is given from the dropdown menu. The leg is set to on or off from the other dropdown menu.
Get leg
Returns 0 if the leg given is connected to ground, otherwise it returns 1. The leg given as a number block that can be changed or replaced with variable block.
Set leg
Sets the given leg to the given value. The leg number should have a value of between 0 to 3.
Read analogue leg
Returns the analogue value read from the given leg. This value ranges from 0 to 255 relating to the voltage connected to the leg (0 is 0v Vcc is 255). The leg number should have a value of between 0 to 3.
Music
These are blocks for controlling the music output of CodeBug.
Play tone
Plays the given tone (frequency as a number block or note block) for a given time (milliseconds as a number block or a beat block).
Start tone
Starts playing the given tone (frequency as a number block or note block) until the program reaches a stop tone block.
Stop tone
Stops any tone that is currently playing.
C (Note block)
Returns the frequency of the note selected in the drop down menu, to be played using a play tone or start tone block.
Beat
Returns a number of milliseconds for the number of beats specified in the drop down menu, based on the current tempo (120 bpm default). The drop down ranges from 4 beats to 1/32 of a beat. You can also remove the beat block and enter a number of 1/32ths of a beat!
Set tempo
Sets the tempo (number of beats per minute) that music blocks should be played at. The minimum tempo is 1 bpm and the maximum is 255 bpm.
Change tempo
Changes the tempo by a given amount as a number block.
Tempo
Returns the tempo that is currently set.
Servo
These are blocks for controlling the servo motors from CodeBug. Connect the power and ground wires to a suitable power supply and connect the signal cable for the servo to one of CodeBug's legs. Servos are controlled by sending electrical pulses of different durations. CodeBug will calculate these timings for you in the position block, or if you're feeling advanced, you can set them yourself.
Set servo
Moves the servo connected to the given (leg as a number block) to the given position. The position block takes a number between 0-255, which on most servos corresponds to between 0 and 180 degrees of rotation. Advanced users can replace the position block with a pulse width specified in 0.5 microseconds.
Position
Use in the set servo block to convert the given position (as a number from 0-255) to a pulse time in 0.5 microseconds in range 1400-4600.
ColourTail
These are blocks for controlling ColourStar and GlowBug add ons. You can get your own ColourStar or GlowBug from the shop
Set colour pixel (palette)
Sets the colour of the pixel number given, to the selected colour in the palette dropdown.
Set colour pixel (composition)
Sets the colour of the pixel number given, to the selected colour mixed from the Red, Green and Blue composites given as number blocks.
Get colour from colour pixel
Returns the value (0-255) of the composite colour (Red, Green or Blue) given for a colour pixel given by a number block.
Clear colour pixels
Sets all colour pixels attached to CodeBug to off (Red:0, Green:0, Blue:0).
If
These blocks allow the conditional execution of the blocks inside them. Use if blocks to make your program do different things depending on if something is true or not. For instance do something if Button A is pressed. You can modify the if blocks to put more sections e.g. 'else if' by clicking the cog on the block and dragging new blocks into the if container block. The UK National Curriculum refers to this as selection.
If
Will run the blocks inside it, if and only if its associated condition is true.
If else
Will run the blocks inside it, if and only if its associated condition is true, otherwise it will run the blocks contained in the else section of the block.
If else if else
This block takes two conditions. If the condition is true, the first blocks will be run, otherwise it will check the second condition, if the second condition is true, the associated blocks will be run, otherwise it will run the blocks contained in the final else section of the block.
Loops
These blocks are used for repeating blocks inside the body of these loops. The UK National Curriculum refers to this as repetition.
Repeat n times
This block repeats the code inside it, the given number of times. The number of times to repeat is given as a number block and should be given a value or at least 0, although negative numbers will be fixed to 0 anyway.
Repeat while/until true
This block will run the code inside it repeatedly either:
while the associated condition is true
until the associated condition is true
Count with
This block repeats the code inside it and changes a variable each time it repeats the loop. The drop down selects the variable which will be changed, the 'from' value sets the starting value (the value it will have for the first time round the loop), the 'to' value sets when the loop will be finished and 'by' value sets the step value – how much the variable will be changed each repeat. These values are given as number blocks that can be changed or replaced with variable blocks. The variable’s value can be used and altered from within the loop.
Logic
These blocks allow you to test conditions and are useful to make conditional statements. e.g. You may wish to check if a variable is less than a particular value.
Comparison
This block can compare two numbers in various different ways listed below. If the equation is true then the block returns true, otherwise false is returned. The values can be given as number or variable blocks.
| Symbol | Operation | Description |
|---|---|---|
| = | equal | If the first number is equal to the second number. |
| != | not equal | If the first number is not equal to the second number. |
| < | less than | If the first number is less than the second number. |
| <= | less than or equal to | If the first number is less than or equal to the second number. |
| > | greater than | If the first number is greater than the second number. |
| >= | greater than or equal to | If the first number is greater than or equal to the second number. |
Logical Operation
This block performs the logical operations below (selected by drop down menu) on its given boolean inputs. e.g. You may want an if block to test if both Button A AND Button B are pressed at the same time.
| Operation | Description |
|---|---|
| And | Returns True if both the inputs are True, otherwise returns False. |
| Or | Return True if either input is True, otherwise returns False. |
Truth tables
| And | True | False |
|---|---|---|
| True | True | False |
| False | False | False |
| Or | True | False |
|---|---|---|
| True | True | True |
| False | True | False |
Not
Returns the opposite boolean value to that connected to it.
Truth table
| Not | |
| True | False |
| False | True |
Boolean (true/false)
Returns the boolean value specified from its drop down menu. Use them when you want a value which is always true or false. e.g. to loop forever use a condition of true in a repeat while block.
Maths
These are blocks for performing maths calculations.
Number
This block can be changed to any whole number. We provide you with number blocks 0 and 1 for convenience, because both are extremely useful!
Arithmetic + - x ^
| Symbol | Operation | Description |
|---|---|---|
| + | add | Adds the first and second inputs together. |
| - | subtract | Subtracts the second input from the first input. |
| x | multiply | Multiplies the first and second inputs together. |
| ÷ | divide | Divides the first input by the second input (gives the whole number without the remainder). |
| ^ | power | Raises the first input to the power of the second input. |
Remainder of (modulo)
Returns as a number, the remainder of the first number divided by the second number (i.e. what’s left over of the second number going into the first number as many whole times as it can). e.g. 5 divided by 2 has a remainder of 1.
Random integer
Returns a random whole number between the first number and the second number (inclusive). e.g. If you set it from 2 to 5, it would return 2, 3, 4 or 5 randomly.
Scale
Returns a number scaled from one range to another range. e.g. Scaling 9 from the range (0 to 10) to the range (0 to 100), would return the number 90. You can also use it with reversed ranges e.g. Scaling 9 from the range (0 to 10) to the range (10 to 0), would return the number 1.
Variable
Variables are a way of storing important values or text. In some ways they're a bit like the memory function on a calculator. You can store a value in a variable and then use it later. Note that you should make sure your variable has the right sort of value in it. If you store a string or character in it, you shouldn't use it in a maths block!
Set variable
Sets the value of the variable name specified. Use the drop down to choose an existing variable name or to create a new one. The input of this can be a number, text, or sprite block.
Get variable
Gets the value of the variable name specified. Use it in other blocks where you'd give it a number, text or a sprite.