Creating Tethered CodeBug programs
You can write your own Tethered CodeBug programs using Python and a few simple commands to control your CodeBug. In the next steps you will start an interactive Python session and enter commands to interact with your tethered CodeBug.
Open a Terminal and type
python3You will see the python prompt appear >>>. Now import the CodeBug I2C library by entering
import codebug_i2c_tether

cb = codebug_i2c_tether.CodeBug()

cb.open()

cb.set_pixel(2,2,1)
You will see the center LED light up on CodeBug.
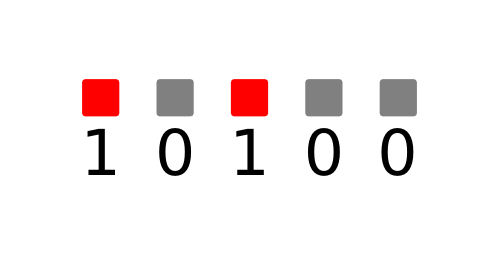
Try setting a row of CodeBug’s LEDs at the same time
cb.set_row(3,0b10100)You will see the third row of LEDs light up in the sequence you gave. 0b10101 is a binary value. The 0b shows that it is binary and the 10100 determines which LEDs are on. 1 represents on and 0 represents off. This means that the LED to the far left is on (column 0), the next LED is off and the next on (column 2), and the other two LEDs are off.
Write text on the CodeBug’s LEDs, using the command
cb.write_text(0, 0,'A')An A will appear on the CodeBug LEDs
To write scrolling text on the CodeBug’s LEDs, first import the time module:
import timeYou can now scroll text using the commands:
for i in range(0,-30,-1):

    cb.write_text(i, 0, 'Hello', direction="right")

    time.sleep(.1)
The text "Hello" will scroll
Check whether a button is pressed, by giving get_input either an ‘A’ or a ‘B’ or numbers 0-3.
cb.get_input('A')This will return True if the button is pressed, otherwise it will return False.
Press Crtl D to exit Python.